SharePoint Best Practices : Part 1

Create SQL Server Alias in SharePoint Farm

Recently we ran in to a problem, where our production application suddenly started throwing 502 errors due to performance degradation. After analyzing few things, we suspect that our database server has some problems. As this was a production server and we didn’t want to keep this problem for a long time, so we decided to create a new instance of production database server parallel and we were lucky that we used the SharePoint best practice of creating SQL Server alias. After copying the databases to new server, it took only 5 minutes to point all the WFEs and App servers to new database server.

Right time to set up a SQL Server Alias: After installing the SQL Server and before installing SharePoint on the farm.

Why we need a SQL Server Alias: This should be the number 1 best practice during a SharePoint farm setup. Consider the scenario, One fine day database server gets crashed or faulty and there is no way to recover it or its time-consuming to recover the server and you don’t want your business site go down for a while.

When we install SharePoint on a farm, during SharePoint_Config database creation, the wizard asks for SQL Server name/IP with user credentials to proceed. SharePoint then saves this information as hard-coded at multiple places for future operations (database/registry etc.). Now if you need to change the database server in any case then you can’t simply change the server as previous server name will already be hard-coded on the farm.

So for such scenario, you create a permanent SQL Server alias for your SharePoint farm and can change the database server name/IP under the hood without recreating the whole farm as SharePoint will be continued referring the alias name in place of server name/IP.

Steps to create a SQL Server Alias:

  1. Go to SQL Server box and fire SSMS editor; run query

    select @@SERVERNAME

  2. Above step will give you the name of SQL Server instance. Copy it for later use.
  3. Now go to application/wfe server; Open SQL Server client network utility. (I would recommend that on every machine do the aliasing on both flavors i.e. 32 bit and 64 bit)
    1. For 32 bit;

      C:\windows\system32\cliconfg.exe

    2. For 64 bit;

      C:\windows\syswow64\cliconfg.exe

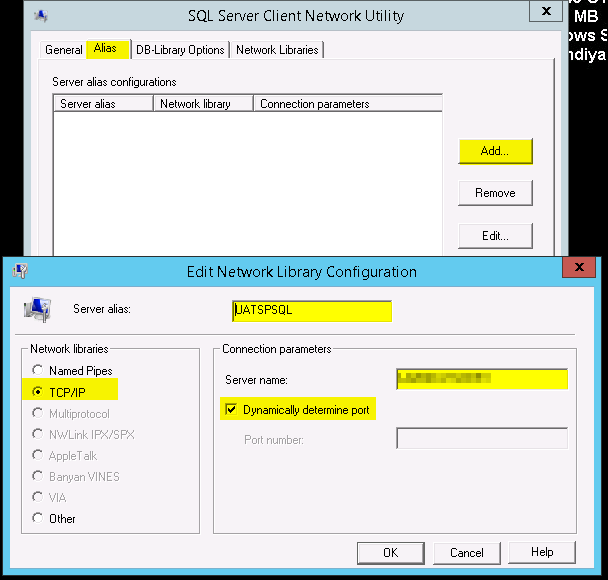
  4. Do the steps as highlighted in below screenshot. Click on Alias tab, and click on Add… button.
  5. Give a user-friendly name in Server alias: box, select TCP/IP in Network libraries section.
  6. Paste the details from #2 in Server name text box and check Dynamically determine port and click Ok.
  7. 2018-06-07 15_16_39-Clipboard
  8. Do step #3-#6 on all servers in farm and you are done with SQL aliasing.

Use the SQL Server Alias, wherever a database server instance name is required (config files, farm setup etc.). This is the best way to hide the SQL Server instance name as well.

Happy SharePointing 🙂


SharePoint search is returning 500 internal server error page : Resolved

Recently i was working on a Intranet Portal and most part of it was based on documents collaboration. So to easily find a document i configured search for the site. I created a new content source in existing search service application and crawl the source. It was crawled successfully without showing an error or warning, but when i opened the site in IE i was presented by an 500 internal server error page. I tried one more time and same result, i suspect that there is something fishy in IIS (may be application or app pool is stopped). To my surprise there was nothing like that, i reset the IIS but same result. After checking the log file i found this weird entry.

System.Resources.MissingManifestResourceException: Could not find any resources appropriate for the specified culture or the neutral culture.  Make sure “Resources.lutron.core.resources” was correctly embedded or linked into assembly “App_GlobalResources.0whxr_of” at compile time, or that all the satellite assemblies required are loadable and fully signed.    at System.Resources.ResourceManager.InternalGetResourceSet(CultureInfo culture, Boolean createIfNotExists, Boolean tryParents)     at System.Resources.ResourceManager.InternalGetResourceSet(CultureInfo culture, Boolean createIfNotExists, Boolean tryParents)     at System.Resources.ResourceManager.InternalGetResourceSet(CultureInfo culture, Boolean createIfNotExists, Boolean tryParents)     at System.Resources.ResourceManager.GetObject(String name, CultureInfo culture, Boolean wrapUnmanagedMemStream)     at System.Web.Compilation.BaseResXResourceProvider.GetObject(String resourceKey, CultureInfo culture)     at System.Web.Compilation.ResourceExpressionBuilder.GetResourceObject(IResourceProvider resourceProvider, String resourceKey, CultureInfo culture, Type objType, String propName)     at System.Web.HttpContext.GetGlobalResourceObject(String classKey, String resourceKey, CultureInfo culture)     at Microsoft.SharePoint.Search.SPSatelliteResourceExpressionBuilder.GetResource(String classKey, String resourceKey)     at ASP._layouts_accessdenied_aspx.__BuildControlltAccessDeniedCaption()

After sometime i opened the site in Chrome and search was working fine there same was with Firefox. So i thought that there is problem with browser not with SharePoint server. After digging in to IE settings i came to know that there wasn’t any default language set for my IE (Might be i removed this for some testing purpose.)

Every user has a search preference inside SharePoint site and it can be accessed through below link.

http://My_SharePoint_Site/_layouts/EditUserPref.aspx

In this page, by default search language is set as ‘Search using my browser’s language‘. Other option is ‘Search using the following languages (maximum of five)‘. So if the option 1 (default) is selected then there should be a default language set in your browser otherwise you’ll get 500 internal server error.

In case option 2 is selected, then search is not dependent on browser language preference. In my case i just set the browser default language in place of opt for option 2. Below are the steps.

  1. Tools > Internet Options.
  2. Under General tab, click on languages button.
  3. Inside Language Preference window, add a language (in my case it was English (United States) ). If you add multiple languages in this window then the first one will be treated as the default language for browser.

*You can also opt for option 2 mentioned above as per your choice.

Happy SharePointing 🙂

PeoplePicker not showing FBA users (Claims Based Authentication)

Recently i faced an issue in a SharePoint site while i was trying to add a FBA user in a site group. On searching the user in people picker, it was not showing the FBA user(s) to select. Every time i searched the FBA user(s) through people picker, it returned me only user(s) from AD. I searched Google but no clear instructions on how to resolve this issue. Finally after some R&D, i was able to resolve this. So i thought to pen it down step by step for you guys. Here are the steps.

First we need to know the values of ‘Membership Provider’ and ‘Role Manager’ of web application.

1. Navigate to Central Administration > Application Management > Manage web applications (Under Web Applications section)
Or
Directly navigate to http://<CA URL>/_admin/WebApplicationList.aspx

2. Select web application (That’s need to be configure for FBA users search.).
3. Click on Authentication Providers from ribbon.
4. Inside Authentication Providers pop up, Click on ‘Default’ hyperlink under zone column.
5. On Edit Authentication Modal popup page, go to Claims Authentication Types.
6. Note down the value of ‘ASP.NET Membership provider name’ and ‘ASP.NET Role manager name’.
7. Exit from the CA.

Make entries in web.config of application.

1. Open web.config file inside ‘C:\inetpub\wwwroot\wss\VirtualDirectories\<Application Folder>’ folder.
2. Search for ‘<PeoplePickerWildcards>’
3. Now add values of ‘Membership Provider’ and ‘Role Manager’ in this section as shown below.
<PeoplePickerWildcards>
<clear />
<add key=”<Your Membership Provider Value Goes Here>” value=”%” />
<add key=”<Your Role Manager Value Goes Here>” value=”%” />
</PeoplePickerWildcards>
4. Save and close the web.config.
5. Now find FBA user through people picker and it will work.

Happy Share Pointing 🙂

Proper Deployment Steps for SharePoint Timer Job Service

I created a share point time job using visual studio 2010. I deployed that job using VS and i got some error while debugging this job. I rectified the error and again deployed this but when i debugged again my timer job picking up the old references. For my wonder i deployed this again and again but same issue was still there even i manually deployed the job and referenced assemblies in to GAC. At last i removed each and ever reference manually and again redeployed this but the problem was pathetic and my recent changes were not picked up by timer job. Finally i came to know that “SharePoint 2010 Timer” service holds the old reference even i redeployed the solution by visual studio. So below are the steps that how i rectified this issue and the proper way of deployment of SharePoint Timer job so that if you modify the timer job code and redeployed this then new changes should be picked up by timer job.

  1. Deploy the timer job first. (Either directly by Visual Studio or Power Shell script or STSADM using wsp).
  2. Go to Start > Run (Windows Key+R)
  3. Type Services.msc and hit enter or click on OK.
  4. Now inside service console locate “SharePoint 2010 Timer”.
  5. Stop and Start service (You can directly use Restart option).
  6. Now go to Start > Run (Windows+R) again
  7. Type IISRESET and hit enter.
  8. After iisreset successfully your new modifications inside timer job code will be picked up and service will run smooth(If code written for timer job is correct.).

Happy SharePointing 🙂 Enjoy 🙂

Installing assembly in GAC in Windows Server 2008 : Resolved

I developed an event handler and need to deploy it on production server. My production server is built on Windows 2008 Enterprise Server 64 Bit and there was only one installation on server i.e. SharePoint Server 2010. Now I need to install my assembly in to GAC. I copied my .dll to production server. Then I opened c:\windows\assembly and drag drops my assembly in to GAC (c:\windows\assembly folder). But nothing happened and my assembly couldn’t install in GAC 😦

Drag and drop was not working. So second alternative was to use gautil.exe to install the assembly inside GAC but as it was production server so there wasn’t any installation of visual studio and hence there was no SDK installed therefore there wasn’t such exe like gacutil.exe. Again that was a problem. Now I worked on why drag and drop is not working. I searched here and there and follow some articles but nothing helped me. I disable UAC and restart server but it doesn’t work. I opened console and explorer using run as administrator but nothing helped me. Then I copied gacutil.exe file from my development machine to production server but I couldn’t run it (Though lastly this technique worked for me).So finally I resolved this issue and below are the directions for how to resolve this?

1. First check that if production server is of 32 bit or 64 bit?

2. If it is 64 bit then open folder “C:\Program Files (x86)\Microsoft SDKs\Windows\v7.0A\Bin\x64

But if it is 32 bit then open folder “C:\Program Files (x86)\Microsoft SDKs\Windows\v7.0A\Bin

3. Copy 2 files i.e. gacutil.exe & gacutil.exe.config

4. Paste these files to any location of production server.

5. Your gacutil.exe is now ready to run and u can install assembly in to GAC using this small utility.

 Points to Remember

* When you drag and drop assembly in GAC it won’t give proper error messages (Like targeting framework error) if it has any so better to use gacutil to install assembly.

* gacutil.exe doesn’t run standalone rather it needs a configuration file to run i.e. gacutil.exe.config

Command Line Error by STSADM : Resolved

I was executing a command using stsadm and when I hit enter it was displaying an error stating that “Command Line Error”. Everything was perfect from my end but it was weird to getting this error. So finally I could resolve this. For information how to resolve this find my earlier blog post here.

Though it was for a different problem but resolution of both problems is same.

Enjoy SharePointing……….

Resolved: The given assembly or codebase was invalid error by stsadm command

I was trying to register custom profiledeletehandler by using stsadm command line utility. My command, code and assembly were perfect. But even then when I was trying to execute stsadm then it was displaying “The given assembly or codebase was invalid”.

Humnnn what could be the problem then after doing some research I came to know that I wrote the part of the command in notepad first and then copy/paste this part in command line. OMG, that was some encoding problem while copy/pasting the command.

Though if you delete the stsadm command and retype this in command line console then both (earlier & retyped) will look same. But this was only and major difference and solve the problem.

Solution: Please type the whole command by your own including each and everything.

Moral of the Story:

1. Avoid copy/pasting the stsadm command from other application as you can be the victim of this type of problem.

2. Always do check for PublicKeyToken values (If u are using assembly reference) twice and other spelling mistakes in stsadm command, as it can be the cause of these type of problems.

Create Hierarchies Link in SharePoint Variation Site is not working : Resolved

Problem: Inside variation labels, if we click on create hierarchies button nothing happens.

Scenario: I had a publishing site with variation enabled on a specific port. I backed up the site and restore it on a web site hosted on another server. This new website is on different port. Now i created a new variation label inside new site and after creating variation label, when i clicked on Create Hierarchies button nothing got happen. So i started to search the root cause of this problem. I first open the variation link to check the variation settings and here i found that location in the variation home section was pointed to the old server and settings were disabled. Humnnn it meant that this was the root cause of the problem. So question arises that how to change the settings as i wanted to keep all the sites that were earlier created by using variation hierarchies and using GUI there was no option to reset these settings. After searching Google, i couldn’t find any specific things regarding this. Problem was that linking in variation settings was not appropriate. So after spending lots of hours to fix this problem i came to know that there is a hidden relationship list inside the publishing site that has variation functionality. So after tweaking my site URL i got that list. Below are the steps to fix this problem.

1. Append your root site URL like this “http://testserver:9001/relationships%20list/allitems.aspx“.

2. Relationships List will open and here you will see so many entries of (no title) depending upon the earlier sites created.

3. You have to open and view each item until you find the value “F68A02C8-2DCC-4894-B67D-BBAED5A066F9” against the GroupId column.

4. This item has relation link for variation home site and this value will same for all publishing sites having variations.

5. Edit the item.

6. Against ObjectId column fill the URL of root site e.g. http://testserver:9001

7. Give any title and click on OK button.

8. Come out from that list, create a new variation label and then create hierarchies button.

9. Voilà hierarchies are creating now.


Create large size file for testing on the fly!

Suppose we write some custom code for uploading/downloading files. Now we want to test the size limitation of a file for Uploading/downloading the file. So for achieving this we look a large file here and there in our system for testing.

Here i am demonstrating that how to create a large file for testing in such scenario on the fly by simply putting a command in command prompt.

  1. Open command prompt as an administrator.
  2. Write the command without quotes “fsutil file createnew C:\testfile.doc 1024000” and the simply press enter.

Now you have a 1 mb testfile in your c drive.

You can give any valid location, name, extension and size of the file to create.

Happy tricking 🙂


Exports excel data to SharePoint custom list with desired column names!

So once again I am back with a blog post…

Today we will see that how to import a spreadsheet inside a custom list with defined columns.

We are ready for production deployment for an application. This application contains the master data for cities all over the world. Client provided us the list of 9000 cities that need to be inserted inside master custom list as we know that 9000 entries will take the hell lot of time to add in the list. So how would I do it within the sort span of time?

The only way that I put all the cities inside an excel and then create a new a custom list by importing that excel. So I start the thing. I create a list using import spreadsheet option but ooopsssss all cities updated inside that custom list but when I look at the column name this shows me like Column1, Column2, etc….

This was very disappointing as this list and columns are used in my custom code, and I don’t want to change my code due to this.

SO QUESTION WAS that I want 9000 entries inside custom list with desired column names…

What to do so below are the steps to do that.


  • First open the excel sheet.
  • Paste the data inside excel sheet accordingly you want.
  • Now in the first row put the column name that you want the list column name.
  • Remember that between two columns there should not be any column left blank.
  • Now select first cell of the sheet.
  • Click on Insert tab and then click on the table.
  • It will open a Create table window with the selected range of data.
  • Select my table has headers checkbox then ok.
  • Now your sheet is in a table format, and we are on the way.
  • Now open the site and select on create.
  • Create the custom list using import spreadsheet option
  • Give a name of the list and path of the excel sheet and click on import.
  • It will open the excel sheet and a window.
  • Select cell ranges in the drop down and give the range of the cells.
  • Just import and after completing the process we have a custom list with data and desired column names.

Happy SharePointing 🙂